Sunday, June 3, 2012

2012 Update!

Updated... with pictures...

Much has happened since my last post over a year ago. We sold Chaska Shasta I (Chloe) to a brand new Vintage Shasta Enthusiast in Utah who was just delighted to have her. This happened last July -- my wife and I personally delivered her to her new owners, meeting them half way between Minnesota and Utah at Mt. Rushmore in South Dakota. While it was tough to see Chloe go, Colleen and I knew she was going to a good couple. They had already purchased wings for her! It was also fun taking her cross county one last time, stopping at various places to eat and sleep in the little 10 foot compact.

What we brought home in 2011 - What did we get ourselves into?
Yes, that's me standing on the GROUND under the trailer...
Andy helping out...under dad's watchful eyes...

 Meanwhile, back in Minnesota, lots of work continued on Chaska Shasta II, now known as Clementine, a name chosen by my kids. With the insides completely stripped, we made plans for the way we wanted the trailer to be laid out. Purists would scoff at the redesign, but my feeling is that she has been redone for modern camping on the inside, while maintaining her 1960 canned-ham image on the outside. As the floor was rotted in numerous places, we completely replaced it. New insulation was put in the walls along with new 110 Volt wiring and plugs, 12 volt wiring and lights, 12 volt exterior trailer lighting, and audio lines for built in speakers.

A Year later... Looking back toward the back of the camper (where Gaucho once was is now a dinette).  I tried placing cabinet doors in many places for storage of items while on the road...
Maybe a little better picture -- showing the fold down upper bunk.  We had a table that attached to wall, but are thinking of just using a freestanding one that can be easily stored when we don't want it -- or placed outside.
Looking toward the front.  Where dinette would have been is now a full-length fixed couch/bed.  That is a room air conditioner in the lower part of the picture that tucks under the countertop.
New bead board paneling was installed and painted a light yellow color (walls) and white (ceiling). I moved the roof vent as the old one would interfere with my new cabinet plan and relocated it further back and more centered in the camper. Some of the flat glass (thankfully not the Jalouise) window glass had to be replaced, which was remarkably easier than I thought it would be. I also removed an ugly household style exhaust fan that a PO had installed above the old range. In the front of the camper, where the dinette once was, we created a long couch/bed along with a corresponding permanent (not fold-out) top bunk bed over the top.

It's hard to take good pictures inside a camper... This gives you a better idea of the upper bunk in front.  Also shows the counter that runs along the streetside inside of the camper.  
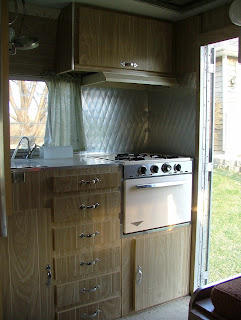
Nifty round sink from Ikea -- had to order this one in from another state as our Minnesota store had discontinued them but I loved the look for the 1960 Shasta...range (gas) and microwave oven and reused hood also in picture.
Closer view of the range with the reused range hood.   In the original layout, this would have been where the sink was located.
At the back of the camper, where originally there was a couch, we created a dinette area much like the 66 compact, with a fold-out top bunk. The dinette seats also pull together to make a super single sized bed. Since the cushions had long been discarded from this neglected Shasta (by a PO), we had to start all over and order new foam, pick out fabrics and my talented mother sewed the covers for both bunks, the dinette cushions and the couch in the front. On the street side of the trailer, I built a long lower cabinet that runs from front to rear which has a gas stovetop, a built-in microwave, a sink, and, believe it or not, COUNTERSPACE! I also built some upper cabinets (thank God for the guy who invented the Kreg Jig! - a must have for any camper renovator). Finally, I also created some drawers and storage cabinets along with space for a room air conditioner under the lower cabinets.

Here is the wardrobe next to the door with the refrigerator.  This unit fits over the wheel-well.   This picture gives you a good view of the beadboard throughout the interior of the camper.  
Right inside the door is a mirrored front medicine cabinet (Ikea) an electrical plug and light switches for an interior and exterior (step) light.  The cabinet below also allows storage of long items, such as fishing poles, marshmallow roasting sticks, etc.  The hinge for the mirror swings into the camper, so that the mirror can also be used when you are standing farther inside the camper, and allows access to toiletries when standing outside the camper (i.e. on the way to the campsite bathroom).
Opposite this, next to the door, I built a large floor to ceiling wardrobe that also contains the refrigerator and another large storage cabinet along with a medicine chest with a mirrored door. We carpeted the floor with commercial carpet squares. We still need to work on curtains and some finishing touches on the inside.

This is the exterior of what we started with a year ago...
June 2012 picture of the outside about half-way through the top $50 paint job.  I love how this is coming out and am glad I followed Vintage Shasta Forum thread on this method of painting...

Part of the challenge to renovating an old camper is inventing new ways to deal with the problems you have inherited.  This is my current problem -- there used to be a large, ugly vent (see two pictures above) in this location.  The wall has been patched and will hold up to weather, etc. but is ugly.  I don't want to replace the aluminum skin (that is more of a project than I want to take on).  Thinking of using a 12 x 12 louvered vent cover, but having a difficult time finding good looking vent covers.  I would paint the space under the louvers black... Any ideas anyone?
Now that I have Clementine out of winter storage, I need to focus on the outside. As I mentioned last year, I took Red Dirt Shasta's advice and polished the Z stripe. I started my $50 paint job (rolling on oil-based Rustoleum paint thinned to 50% with mineral spirits and applying with foam brushes, sanding between coats) this weekend and am very pleased with the results so far (3 of 6 coats for the top, off-white part). I found a mechanic willing to repack bearings (which probably have not been repacked in at least 25 years) so that's next, along with new wheels and tires purchased this spring at Northern Tool. With luck, we should be able to take her on the road by early July!  She sure looks different one year later!

Sunday, May 22, 2011

Chaska Shasta II


We enjoyed the '66 Shasta Compact so much that I guess we got the bug. So yesterday, while sipping coffee on a lazy Saturday morning, Colleen mentioned to me that there was a '60 Shasta on Craigslist. I kinda scoffed and said -- "I'm sure it's gone by now -- they never last very long and if you are still seeing it there, the guy selling it must have gotten a dozen calls by now." She said I should call, to which I kinda snarkedly said "You call -- I'll bet you it's gone." An hour later, we were on our way 1 hour north to purchase our newest old camper. I should listen to Colleen more often...The guy who sold her to us had a long list of people he had to call back to let them know she was sold...

This trailer is in considerably worse condition than Chaska Shasta I (or "Chloe" as our kids like to refer to the '66 Shasta Compact).

Chaska Shasta II (yet to receive a nickname by the kiddos -- they kind of see her as a bit of a junk pile right now -- silly kids) has had a difficult second half of her life. For the past couple of years, it seems, a leaky roof vent was later replaced by a piece of plywood that was not sealed in place. The floor will need to be replaced as it is water logged and soft in numerous spots. Nearly all interior components are either missing or not worth saving. This is a much larger project than the '66.


So...here we go. We spent the rest of this weekend removing the floor and stripping off paneling that had been badly damaged. I removed cabinetry that has been water soaked and now we have just the trailer struts and the original wood floor frame and bare walls (previous owner had already removed the ceiling). It will be kind of fun to be able to build the inside to fit our family -- but we intend to stick to a modified Shasta floorplan. While it seems like a lot of work ahead of us, I really like the possibilities. I am encouraged by Red Dirt Shasta in that this unit, at least on the outside, looks very much like his did when he brought Red Dirt home -- so I am following his posts on how to polish the "Z" stripe and how to apply paint via the $50 Paint Job roll on method. Would love to have her professionally sprayed, but at $1000 to $1500, can't justify spending that much.

I'll try to get some more posts out there for this renovation... this is gonna be fun!


Sunday, September 5, 2010

Duluth Tall Ships Trip

As promised in my last post, we made plans to take the Chaska Shasta up to Duluth for a short trip to see the "Tall Ships" tour. I spent way too much time agonizing over which campground we should stay at -- heck, it was for one night -- even a bad campground is doable for one night, right? Anyway, we finally chose the Spirit Mountain Campground which is just west of Duluth. This was a terrific choice -- the campground is beautifully rustic -- you feel like you are in the middle of a forest, yet there are modern facilities (i.e. bathrooms and showers) within walking distance of most of the campsites. Our only complaints about this campground is that the bathrooms could use a little TLC (they were pretty worn down) and it would have been nice if there was someway to turn off the streetlights around the campground at a certain time of the night -- we had one right over our site that make it seem like daytime all night. Anyway, I'm off topic way too soon. This was the first campsite where we could hook the Shasta's water system up to a water line. Everything worked like a charm. Keeping to the traditional Shasta design, we have two spigots going into the sink. One that directly hooks to the water supply from the campground and one that is connected to the water tank. As I mentioned in previous posts, I have converted the "hand pump" spigot to an electric (12 volt) pump spigot. We don't drink the water from either source.

This was also our first "big storm" trip. It started raining about 11 p.m. the night we arrived and rained all night until probably 6 a.m. This proved to us why we want to camp in the Shasta -- we were dry and comfortable all night -- it was a bit noisy, but we felt safe in our little 10 foot home-away-from-home.

We only spent a night in Duluth, but got two full-days of sight-seeing in on this trip. It was fun and we would definitely take this same trip again. I scoped out a few other sites at Spirit Mountain that I would consider staying at when we return. We took a trip through Jay Cooke State Park -- Beautiful! They have a campground too, but the Minnesota state park system (in typical "Land of 10,000 Taxes" fashion) nickel and dimes campers to death with fees -- so it is often more economical to go to a private campground -- plus, it benefits the mom & pop businesses way more...Ok... off my soapbox.

This was the last family trip we took in the '66 Shasta that we had nicknamed Chloe -- Fall set in and with it, back to school, winterizing projects and eventually the Shasta went into storage for the Winter.  


Monday, July 26, 2010

Sorry for the lack of posts


I had really hoped to keep up to date on this blog and the summer has gotten away from us.

The beauty of this camper is that we only really had to replace wood on the ceiling, which we did, with beadboard.  We did remove one cabinet which was not very functional and made it difficult to get into and out of the dinette.

We have taken the Shasta on a few trips since my last post. Each time we learn a bit more about what we need, etc. The Shasta has been a great home on every trip. Even though she is only 10 feet long, we sleep and camp two adults and our three younger children in comfortably.

A trip to Northern Minnesota a few weeks ago proved what babies we all are though. We were in the midst of a Minnesota heat-wave and found out that we had become very comfortable sleeping in air conditioned comfort. A windless night at 85 degrees made us think twice about an upcoming trip to Iowa and Kansas we were set to go in July.

I began to think about a solution. Window air conditioner units are not practical -- especially with the vintage Jalousie windows in the Shasta. I did not want to cut a 2 by 3 foot hole in the side of the camper. I was not sure if the Shasta would support a camper roof top unit -- plus they were prohibitively expensive! Then it hit me -- there was another option. We have several portable room air conditioners in various offices where I work (I work in a largely un-air-conditioned building). These room units have a 8 inch exhaust tube that goes to the outside -- this exhausts the hot air that is emitted from the air conditioner. Newer units don't even need a tube for emitting condensate -- they blow the hot air from the exhaust onto the collected condensate inside the unit -- evaporating it along with the hot air. Even if I had purchased an older unit, or if this unit cannot keep up with the condensate in it's evaporative mode, simply attaching a hose to the back of the unit and running it through the hole where the icebox used to drain would be acceptable.

So I went about trying to find a unit -- looking where it all started with the Shasta -- Craigslist. In the heat of summer, these units go very fast! As luck would have it, I found a used unit for a great price. I drove across town, found that the unit was in great shape so soon my new (at least new to me) air conditioner unit was riding shotgun with me back to the Shasta.

Cutting a small 8 inch round hole in the side of the camper was much more acceptable to me than other venting options. Vintage camper enthusiasts are probably cringing right now, but really, the cut was minimal. I placed the vent near the other utility connections on the front, street side of the trailer. I purchased one of those louvered dryer vents in white. The vent fits right in along beside the gravity fill water connection. It is hardly noticeable. When you look at newer rigs, they have all variety of doors, vents, connections, and other dohickeys.

I found that the air conditioner fit perfectly in the closet - this allowed it to be out of the way when it was not being used and when we wanted to use it, we just opened the closet door. The exhaust venting tube made a 360 degree loop with the excess storing in the area under where the icebox sits (note that my Shasta's icebox was removed by a previous owner, so I have filled the space with a smaller A.C. refrigerator and a small microwave).

We knew that we made the right decision when we arrived and set up camp in Iowa. The outside temperature was near 90 degrees, but we slept comfortably -- under blankets inside the Shasta. The next two nights in Kansas were equally restful. It does not take a lot to cool a 10 by 8 foot space! The humm of the air conditioner also drowns out any late-night parties that may be occurring outside of the camper.

We did get a bit tired of opening and closing the closet door so by the 2nd night, I temporarily removed and stowed the closet door. This made things a lot more comfortable. I am thinking of removing the closet door and storing it at home and crafting a two-section door for my Shasta's closet so that the lower section could be opened when the air conditioner is being used. While I did not mind cutting the 8 inch hole for the exhaust -- I would not consider ruining the original closet door -- so I would craft this 2 section door out of something else and keep the original door intact and safely stored for replacement when I want to return the Shasta to vintage condition.

All in all, the Air Conditioning made sleeping a lot easier. Call me spoiled -- but I don't want to sweat when I sleep. Of course, I also want a few more comforts of home in my rig -- that's why I opted for the Shasta and not a tent-camper or worse (at least for me) a tent. I don't want to rough it that much!

Well, better sign off for now. We love the Shasta and hope to go see the Tall Ships in Duluth for at least a night. I'll let you know how that trip goes.


Friday, May 28, 2010

Assessing the damage

As you can see by the hole in the roof, this is what we started with. There was water damage that permeated the entire front ceiling panel. It appeared that this was fairly new water damage though, so I did not run into mold or really that much damage to the surfaces that the ceiling was in contact with (i.e. walls). The nice part was that I did not need tools to remove the ceiling. A gloved hand moved through it all.


Bringing Her Home...

My wife is a Craigslist expert. She regularly shows me campers and other items that she likes so that fateful Sunday morning in early April did not phase me too much when she showed me a 1966 Shasta Compact on her computer. I went along and encouraged her to contact the guy selling the camper. We were the first to call! She talked to him a bit more and as she spoke with him, I listened in to about half the conversation -- gradually becoming more interested. By the end of the conversation, she put her hand on the phone and asked my permission to purchase the camper, sight un-seen!

I guess I must have been in a pretty good state of mind because I agreed. Several hours later, we were two hours north of our home and sealing the deal.

As we were hooking up to pull away, I noticed that there were absolutely no safety chains on the trailer.  Now I have this voice in my head that is my father's voice and I could hear him, clear as day, disapproving of this setup.  I was unsure what else I could do --  Keep in mind that this was a Sunday afternoon - approaching evening and we were two hours away from home. I knew of one home improvement store about 10 miles away that we had passed on the way to get the trailer. I anxiously drove those 10 miles sure that the trailer was going to unhook itself from the tow vehicle and take out both the cars behind me as well as the gem we had just purchased. We pulled into the store and found that it had closed 10 minutes earlier -- lights were dark and no cars were in the parking lot (so I could not even beg someone to let me in).

I remembered passing a 24 hour Walmart about 10 miles further South. As I hit every bump and pothole on the way out of the Menard's parking lot, again knowing for sure that the trailer would be freeing itself at any moment, we made our way back onto the highway and made it to the Walmart after 10 more anxious miles.

Now I did not even know if Walmart would have a safety chain for a travel trailer - but it was worth a shot. So I made my way back to Sporting Goods on a Shasta Wing and a prayer and was pleasantly surprised to see that they had one. Within a few minutes I had purchased and installed, the best I could, the chain. Now, I could at least drive knowing that if she did disengage herself from the car, at least she would still follow me until I could pull over.

The remaining trip was uneventful. The trailer followed us just like a new found lost puppy. The little Shasta seemed to know that she was going to a new, loving home! When we got home, our kids (who were staying with Grandma who had come over to watch them while we made the trip North) came out and fawned over the new camper. My wife and I knew that we had a lot of work ahead of us, but it would be worth it in the end. We started making plans for family trips that night!

Wednesday, May 26, 2010

1966 Shasta Pictures!


Here is a shot of the inside. You can see the damage to the ceiling. As I later found out, the water damage was NOT caused by a leaky vent as first thought -- there were several pinhole sized holes in the roof. I have learned to love Eternabond!

Here is the exterior shot of the "door side" of the camper.